NOTE:
These instructions are for wheelsets with metal axles and
wheels. For wheelsets with metal wheels and non-conductive axles
(e.g.
Kadee) modify these instructions by gluing the resistor to
the center of the axle and using the conductive paint to create
a conductive path from each resistor electrode to a wheel.
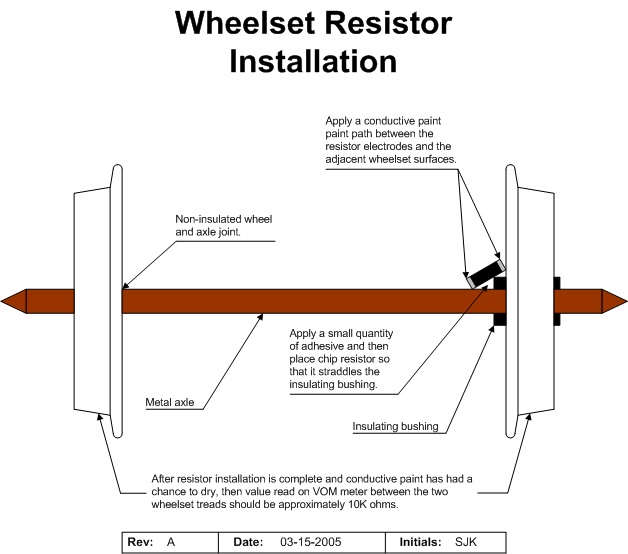
Each car should have a minimum of two resistors, one axle per
truck. I install them on the inboard axle, so as to make them
more discrete, but it is up to you. Optimum resistor values are
10,0000 ohms (10K) 1/8 watt or
10,0000 ohms (10K) 1/10th watt. Bear in mind that the 1/8
watt resistors are plenty small, but the 1/10th watt are really,
really small (approximately the size of a Kadee knuckle coupler
spring). Both wattage values will work equally as well.
Resistors cost around 1-2 cents each when purchased in lots of a
1000, but can be even cheaper if they are purchased in
quantities of 5000 or more.
Most chip resistors that have been done to date have been
attached using 5-minute epoxy, which is mixed up in small
amounts to do about 3 or 4 axles at a time. However, an
alternative method being used is
IC-2000 rubberized CA Adhesive (it is the fourth one down on
the page) by BSI (Bob Smith Industries). It is a good adhesive
for attaching resistors to wheelsets since it is a CA type
adhesive so it sets up fast, but not too fast, and it retains
its elasticity (shock resistant) after it dries. Unlike
conventional CA, which can become brittle once it cures.
Rubberized CA is used frequently by the R/C car guys to attach
rubber tires to the hubs, therefore Larry's Hobbies (North
Houston Hobby Dealer) is a good local supplier. A 1 oz. bottle
of IC-2000 runs around $8.00. I understand it is also possible
to purchase BSI IC-2000 at outdoor sporting goods centers, since
it can also be used for patching rubber boots, rafts, etc. The
IC-2000 makes the job go much faster and is ready for the
conductive paint in about 5-minutes after application.
As for the silver print circuit board repair paint, it is
available in a small pen-like applicator and in 1/2 oz. bottles.
The CircuitWorks brand of pen costs about $16, which I've heard
both good and bad things about. I've heard that the pen has a
tendency to clog, but others swear by it, since it can make the
process move along quicker than using a brush. It's up to you as
I've never used it myself. I think the pen can be purchased
locally from Fry's Electronics over on I45 near West Rd. or you
can get it mail order
CircuitWorks Conductive Paint Filled Pen (scroll down to
where it says "CircuitWorks Conductive Paint Filled Pen") I have
no idea which tip size would be better.
The
Silver Print (scroll down to p/n GC-22-023) by GC
Electronics, is available via mail-order for around $25 for 1/2
ounce, which will do thousands of wheelsets. The silver print is
also available in a 1 oz. bottle for those that might want to go
in together to split a larger bottle, since it costs less (about
$42 for 1 oz. bottle). The bottle that the silver print comes in
is actually a liquid nail polish bottle and it has the typical
nail polish type brush attached to the cap. This brush, however,
is way oversized for our needs, so I apply it with a
Floquil
#5/0 red-sable brush. In addition, if you go the route of the
silver print, I recommend you put a few BBs (pre-cleaned in
lacquer thinner, so you don't contaminate the contents with the
light oil that comes on the BBs) in the bottle. The silver print
is made with real silver powder in a lacquer solution and the
pigment is very heavy and likes to settle to the bottom of the
bottle, especially when it sits for long periods of time between
use. In order to get the best results, you really need to shake
it well and BBs help to break up the heavy pigment and make a
nice rattle noise when it is ready for use. Use straight lacquer
thinner to clean brushes.
As for pre-resistored wheelsets, I know of two sources:
Jay-Bee Wheelsets are available through Walthers, and
therefore, available through most hobby shops. However, you most
likely need to special order them. Please note, Jay-Bee
wheelsets have slightly oversized axles to accommodate the
resistors inside the axle. I personally have not used them, but
I have heard some bad things about the quality control on
Jay-Bee Wheelsets on various MRR newsgroups in the past in
regards to the wheelsets not being in gauge or the resistors not
making contact. When you try to regauge them by twisting the
wheelset you end up breaking the continuity between the wheels
and you just end up with a plain old expensive fat-axle
wheelset. They may have gotten a little better with their QA
recently, so its up to you whether or not you want to give them
a try. Walthers lists them for about $2 per axle (sold in
packages of 10).
Another pre-resistored wheelset source is
Logic Rail Technologies
from the Houston, TX area. Logic Rail Technologies supplies
standard NWSL
detectable wheelsets with 15K chip resistors glued on, much
like you would do yourself. 15K is a little on the high-side for
a resistor value, but they will work, just may not be as
reliable as the 10K value. However, with 2 detectable axles per
car, it shouldn't be a problem. Also, if you order a substantial
amount, Logic Rail Technologies may be willing to change the
resistor value to whatever you request. Logic Rail Technologies
price list shows they cost around $9 per 4 axles (approx. $2.25
each).
A misconception of some modelers is that they just plan to
change out one axle per truck and leave the existing axles
installed. Technically, this will work as long as the wheels are
the same diameter, however, the aesthetics of the car can be
compromised. By compromise, I mean HO wheelset profiles are like
snow flakes and differ from manufacturer-to-manufacturer, the
new resistored wheelset profiles will most likely not match the
existing wheelsets leaving the wheels on trucks looking funny
because the wheelset faces will be different. The obvious
solution is to change out all the wheelsets with wheelsets from
the same manufacturer to assure that the wheel-face profiles are
all the same. Since the manufacturers that make resistored
wheelsets also make standard wheelsets, you only have to
purchase one resistored wheelset per truck and then use that
same manufacturer's non-resistored wheelsets for the remaining
axles. The next obvious - and least expensive - solution is to
just add resistors to your existing wheelsets (as long as your
current wheelsets have metal wheels). Adding resistors to your
existing metal wheelsets solves both the unsightly "snow flake"
wheel face profile issue and gives you detectable axles on each
truck for a fraction of the cost.
In closing, you can make your car detectable for mere pennies
per axle, but they are available commercially if you wish to go
out and purchase them pre-made. In addition, you are free to
paint the wheelsets after you apply the resistors and silver
print if you like, however, it is recommended that you mask the
wheelset tread before painting or clean it thoroughly after
painting since the paint will severely inhibit the detectability
of the wheelset.
|